Tuesday, November 12, 2013

Google Gson

Google gson is one of the powerful tool which you can convert your Java Object to the JSON and vice versa. Other toll is jackson which you can convert your Java Object to the JSON as well.

I have done a small program which has been done with Google Gson.

Main Gson Implementation Class
package rezg.camel.client.util;

import com.google.gson.Gson;

public class JsonConvertor <t> {

 private T obj;

//This method will convert a passing Object to a Json Strcuture
public String convertToJson(T myObj) {
  Gson gson = new Gson();
  String retVal = gson.toJson(myObj);
  return retVal;
 }

//This method will convert a Json String to an passing Object Type
 public T convertToObject(String jsonString, Class<t> retVal) {
  Gson gson = new Gson();
  obj = gson.fromJson(jsonString, retVal);
  return obj;
 }
}
 
Convert Json String to a Java Object
 private static Customer getObject(String jsonStr) {

  JsonConvertor<Customer> cusJsonConvertor = new JsonConvertor<Customer>();

  Customer myCustomer = cusJsonConvertor.convertToObject(jsonStr,
    Customer.class);

  System.out.println("myCustomer.toString() " + myCustomer.toString());

  return myCustomer;
 }
Convert Java Object to a Json String
 private static String getJson() {

  Customer customer = new Customer();
  customer.setAddress("My Company Address");
  customer.setName("My Comppany");
  customer.setAge(45);

  List&ltString> employees = new ArrayList&ltString>();
  employees.add("Adam");
  employees.add("Jhon");
  employees.add("Anne");
  customer.setEmployees(employees);

  List&ltInventory> invetories = new ArrayList&ltInventory>();
  Inventory inv = new Inventory();
  inv.setAmount("2500");
  invetories.add(inv);

  inv = new Inventory();
  inv.setAmount("3000");
  invetories.add(inv);

  inv = new Inventory();
  inv.setAmount("4000");
  invetories.add(inv);

  customer.setInventories(invetories);

  JsonConvertor&ltCustomer> cusJsonConvertor = new JsonConvertor&ltCustomer>();
  String jsonStr = cusJsonConvertor.convertToJson(customer);

  return jsonStr;
 }

Monday, October 7, 2013

ActiveMQ - How to create multiple instances on the same server

Follow the below steps to create multiple instances on the same server.

Go to your activemq directory bin folder and run the below commands
Create the Instance 1
cd /apache-activemq-5.8.0/bin
./activemq create instance1
./activemq setup ~/.activemqrc-instance-instance1
ln -s /home/[yourHomeDir]/.activemqrc-instance-instance1
Create the Instance 2
./activemq create instance2
./activemq setup ~/.activemqrc-instance-instance2
ln -s /home/[yourHomeDir]/.activemqrc-instance-instance2
Once above commands are executed, go to the instance2 conf and change the default port for the openwire, amqp in the activemq.xml and also change the Connector in jetty.xml.
You can start each instance as below.
cd apache-activemq-5.8.0/bin/instance1/bin
./instance1 console
Open a new Tab
cd apache-activemq-5.8.0/bin/instance2/bin
./instance2 console
Instance 1 - Web Console
Instance 2 - Web Console


Thursday, August 22, 2013

Maven - How to merge files


You can use maven-merge-properties-plugin to merger property files.

<plugin>
    <groupId>org.beardedgeeks</groupId>
    <artifactId>maven-merge-properties-plugin</artifactId>
    <version>0.1.1</version>
    <configuration>
     <merges>
      <merge>
       <targetFile>${Target file name with the src path}</targetFile>
       <propertiesFiles>
        <propertiesFile>${property file 1 with the src path}</propertiesFile>
        <propertiesFile>${property file 2 with the src path}</propertiesFile>
        <propertiesFile>${property file 3 with the src path}</propertiesFile>
        <propertiesFile>${property file 4 with the src path}</propertiesFile>
       </propertiesFiles>
      </merge>          
     </merges>
    </configuration>
    <executions>
     <execution>
      <phase>compile</phase>
      <goals>
       <goal>merge</goal>
      </goals>
     </execution>
    </executions>
   </plugin>

Thursday, July 4, 2013

Maven - How to restrict files when build the project

You can add the below code next to the <build> tag.

  <resources>
   <resource>
    <directory>${src path which files to be ignored}</directory>
    <includes>
     <include>${file1 name}</include>
     <include>${file2 name}</include>
    </includes>
    <targetPath>${target path}</targetPath>
   </resource>
  </resources>

Saturday, May 25, 2013

Waiting...Fatal error: watch ENOSPC

If your getting the above error when run the watch command run the below command to solve it.

echo fs.inotify.max_user_watches=524288 | sudo tee -a /etc/sysctl.conf && sudo sysctl -p

For more details please refer Grunt watch error - Waiting…Fatal error: watch ENOSPC

Wednesday, April 17, 2013

Maven - How to Replace a Token with the value

If you need to replace the Token with the value in a jar you can use the below plugins. This example would replace the token for all the files which is given in a particular location.

 <build>
  <plugins>
   <plugin>
    <groupId>org.codehaus.mojo</groupId>
    <artifactId>properties-maven-plugin</artifactId>
    <version>1.0-alpha-2</version>
    <executions>
     <execution>
      <phase>initialize</phase>       
       <goals>
       <goal>read-project-properties</goal>
      </goals>
      <configuration>
       <files>
        <file>../../maven_config.properties</file>
       </files>
      </configuration>
     </execution>
    </executions>
   </plugin>
   <plugin>
    <groupId>org.apache.maven.plugins</groupId>
    <artifactId>maven-jar-plugin</artifactId>
    <version>2.4</version>
    <executions>
     <execution>
      <id>prepare-jar</id>
      <phase>clean</phase>
      <goals>
       <goal>jar</goal>
      </goals>
     </execution>
    </executions>
   </plugin>
   <plugin>
    <groupId>com.google.code.maven-replacer-plugin</groupId>
    <artifactId>replacer</artifactId>
    <version>1.5.2</version>
    <executions>
     <execution>
      <phase>compile</phase>
      <goals>
       <goal>replace</goal>
      </goals>
     </execution>
    </executions>
    <configuration>
     <includes>
      <include>target/classes/**/*.xml</include>
      <include>target/classes/**/*.properties</include>
     </includes>
     <token>@@portalname@@</token>
     <value>${portal.name}</value>
    </configuration>
   </plugin>
  </plugins>
 </build>

If you need to replace the Token with the value in a war you can use the below plugins. Below example would illustrate how to replace the token and value in a one file.


 <build>
  <plugins>
   <plugin>
    <groupId>org.codehaus.mojo</groupId>
    <artifactId>properties-maven-plugin</artifactId>
    <version>1.0-alpha-2</version>
    <executions>
     <execution>
      <goals>
       <goal>read-project-properties</goal>
      </goals>
      <configuration>
       <files>
        <file>../../maven_config.properties</file>
       </files>
      </configuration>
     </execution>
    </executions>
   </plugin>
   <plugin>
    <groupId>org.apache.maven.plugins</groupId>
    <artifactId>maven-war-plugin</artifactId>
    <version>2.0.1</version>
    <executions>
     <execution>
      <id>prepare-war</id>
      <phase>prepare-package</phase>
      <goals>
       <goal>exploded</goal>
      </goals>
     </execution>
    </executions>
   </plugin>
   <plugin>
    <groupId>com.google.code.maven-replacer-plugin</groupId>
    <artifactId>replacer</artifactId>
    <version>1.5.2</version>
    <executions>
     <execution>
      <phase>prepare-package</phase>
      <goals>
       <goal>replace</goal>
      </goals>
     </execution>
    </executions>
    <configuration>
     <file>${project.build.directory}/${project.artifactId}-${project.version}/WEB-INF/web.xml</file>
     <replacements>
      <replacement>
       <token>@@portalname@@</token>
       <value>${portal.name}</value>
      </replacement>
     </replacements>
    </configuration>
   </plugin>
  </plugins>
 </build>

Friday, April 12, 2013

Maven - Copy Artifact in to a separate location

  • Create a Maven config file in the eclipse workspace.  maven_config.properties
  • Add the following key and value maven.output.build.path=/maven-dependency-plugin/target/test
  • Add the following two plugins to the Maven POM file.


   <plugin>
    <groupId>org.codehaus.mojo</groupId>
    <artifactId>properties-maven-plugin</artifactId>
    <version>1.0-alpha-2</version>
    <executions>
     <execution>
      <phase>initialize</phase>
      <goals>
       <goal>read-project-properties</goal>
      </goals>
      <configuration>
       <files>
        <file>../maven_config.properties</file>
       </files>
      </configuration>
     </execution>
    </executions>
   </plugin>
   <plugin>
    <groupId>org.apache.maven.plugins</groupId>
    <artifactId>maven-dependency-plugin</artifactId>
    <version>2.7</version>
    <executions>
     <execution>
      <id>copy</id>
      <phase>package</phase>
      <goals>
       <goal>copy</goal>
      </goals>
      <configuration>
       <artifactItems>
        <artifactItem>
         <groupId>${project.groupId}</groupId>
         <artifactId>${project.artifactId}</artifactId>
         <version>${project.version}</version>
         <type>jar</type>
         <overWrite>true</overWrite>
         <outputDirectory>${maven.output.build.path}</outputDirectory>
        </artifactItem>
       </artifactItems>
      </configuration>
     </execution>
    </executions>
   </plugin>
  • Run the targets package or install

Thursday, April 11, 2013

Postgre 9.1 Installation

Use the below command to install the postgre
  
   sudo apt-get install postgresql-9.1  
    
Connect to the DB using PgAdmin III

Reset the password
Connect to the postgre DB in a terminal
 sudo -u postgres psql
    
reset the password

 \password postgres

Eclipse Juno - Showing and hiding menu items and toolbar buttons


You can choose to hide menu items and toolbar buttons and then show them again.

Hiding a menu item or toolbar button

To hide a menu item or toolbar button:
  1. Switch to the perspective that you want to configure.
  2. Select command link Window > Customize Perspective....
  3. Open the Menu Visibility or Tool Bar Visibility tab.
  4. Find the item you want to hide. You can do this two ways:
    • Expand the menu or toolbar hierarchy to find the item you want to hide.
    • Click the Filter by command group check box to see a list of command groups which contribute items, and choose the command group the item you wish to hide. Then navigate to the item in the hierarchy in the Structure tree.
  5. Hover over the item to get additional information:
    • a description of what the item does
    • the name of the command group which contributes the item (click the link in this item to switch to the Command Groups Availability tab with the appropriate command group selected).
    • any key bindings associated with the command the item performs (click the link in this item to open the Keys page of the Preferences dialog with the command selected, if possible).
    • if the item is dynamic, a preview of its current appearance (dynamic items are listed as [Dynamic]).
  6. Uncheck the check box next to the item. Uncheck a menu to hide all its children.
  7. Click OK to cause the changes to take effect.
Using the tooltip which appears over items, you can navigate to the Command Group Availability tab and make the entire command group unavailable if you wish to remove all menu items, toolbar buttons and keybindings of all commands contributed by the command group.

Showing a menu item or toolbar button

To show a menu item or toolbar button, you can follow the same instructions as hiding one, except check the check box instead of unchecking it.
If an item you want to make visible is grayed out, this is because the command group which contributes it is not available. You need to make it available before you can show or hide items it contributes. You can do this by hovering over the item, and clicking the command group link in the tooltip which appears.

Friday, March 22, 2013

Useful Maven Plugins


  1. Apache Maven - Apache Maven is a software project management and comprehension tool. Based on the concept of a project object model (POM), Maven can manage a project's build, reporting and documentation from a central piece of information. http://maven.apache.org/plugins/index.html
  2. Mojo - The Mojo project is a collection of plugins for Apache Maven 2 & 3 http://mojo.codehaus.org/plugins.html
  3. http://www.packtpub.com/article/useful-maven-plugins-part1
  4. http://nayidisha.com/techblog/useful-maven-plugins
  5. http://www.ibm.com/developerworks/java/library/j-5things13/index.html
  6. http://repository.ow2.org/nexus/content/sites/ow2-utilities/mergeproperties-maven-plugin/plugin-management.html
  7. http://evgeny-goldin.com/blog/maven-plugins-released/
Other Plugins
  • maven-replacer-plugin - https://code.google.com/p/maven-replacer-plugin
  • properties-maven-plugin

Thursday, March 21, 2013

Integrate VersionOne with the Eclipse IDE

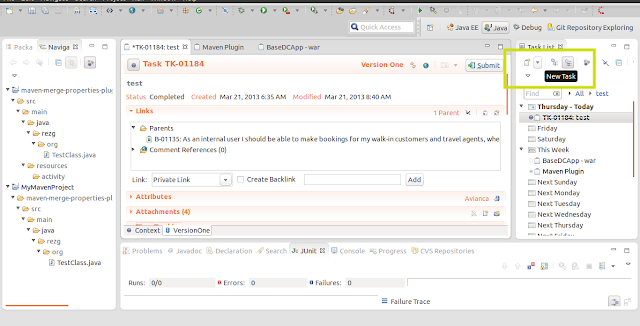
I have explained how to  Track your modified files with Eclipse MyLin in previous blog. This Blog will explain how to connect to the VersionOne through eclipse. If you have already followed the Track your modified files with Eclipse MyLin then it is easy to Integrate with the VersionOne.

Lets see how we can configure VersionOne through the MyLin very easily.

  • Click the New Task Down Arrow key and select "Add Repository"

  • Click "Install More Connectors"


  • Select VersionOne

  • Once the plug-in is installed select the VersionOne from the "New Task" Drop Down Menu and  Enter the Version one lo-gin details. Once the credentials are entered click "Validate Settings" to ensure the success connection to the VersionOne System

  • If you have logged in to the system successfully then you can see all the tasks in the "Task List"


  • Open the assigned task and start working on it. Select Activate Task and then it will track all the modified files and assigned to the relevant task.
  • Add Comments in to the Task
  • Change the Actions, Attache Context and Submit to theVersionOne


  • Attach Screenshots and modified file list

  • Track the working hours , Schedule time, estimate dates


  • View Modified Files


  • Check the Modified tasks in the VersionOne Web tool. 


Friday, March 8, 2013

How to upload Artifact to the repository server

If you need to upload the artifact while you install to the local repository, follow the below steps.

1. Add the following setting in the setting.xml file which is in the local repository

    
      archiva.internal
      [UN]
      [PW]


2. In the POM file add the following settings

  
   archiva.internal
   Internal Release Repository
   [URL For the internal repository path]
  
 
Note : ID of the both files should be same

3. Run the following goal mv deploy

Please ensure upload rights is given in the relevant repository server

For exmple, if your using Apache Archiva then deployment user needs the Role 'Repository Manager' for each repository that you want to deploy.

Thursday, March 7, 2013

MySQL 5.5 - How to change MySQL default character-set to UTF8


  1. First Connect to the mysql usting "mysql" command.
  2. Run the below script to check the current installed character set.                                                    
      
    show variables like “collation_database”;
     
    +--------------------+-------------------+
    | Variable_name      | Value             |
    +--------------------+-------------------+
    | collation_database | latin1_swedish_ci |
    +--------------------+-------------------+
    
    show variables like "%character%"; show variables like "%collation%";
    
    +--------------------------+----------------------------+
    | Variable_name            | Value                      |
    +--------------------------+----------------------------+
    | character_set_client     | utf8                       |
    | character_set_connection | utf8                       |
    | character_set_database   | latin1                     |
    | character_set_filesystem | binary                     |
    | character_set_results    | utf8                       |
    | character_set_server     | latin1                     |
    | character_set_system     | utf8                       |
    | character_sets_dir       | /usr/share/mysql/charsets/ |
    +--------------------------+----------------------------+
    8 rows in set (0.12 sec)
    
    +----------------------+-------------------+
    | Variable_name        | Value             |
    +----------------------+-------------------+
    | collation_connection | utf8_general_ci   |
    | collation_database   | latin1_swedish_ci |
    | collation_server     | latin1_swedish_ci |
    +----------------------+-------------------+
    3 rows in set (0.00 sec)
    
    
  3.  Add below variables in my.cnf which is in the /etc/mysql directory
  4. [mysqld]
    init_connect='SET collation_connection = utf8_unicode_ci'
    init_connect='SET NAMES utf8'
    character-set-server=utf8
    collation-server=utf8_unicode_ci
    skip-character-set-client-handshake
  5. Restart the MySQL
    sudo /etc/init.d/mysql stop
    sudo /etc/init.d/mysql start
  6. Re-run the above SQL statements which is define in the step 2. You will see the char set have been changed to utf8 as below
    +--------------------+-----------------+
    | Variable_name      | Value           |
    +--------------------+-----------------+
    | collation_database | utf8_unicode_ci |
    +--------------------+-----------------+
    1 row in set (0.00 sec)
    
    +--------------------------+----------------------------+
    | Variable_name            | Value                      |
    +--------------------------+----------------------------+
    | character_set_client     | utf8                       |
    | character_set_connection | utf8                       |
    | character_set_database   | utf8                       |
    | character_set_filesystem | binary                     |
    | character_set_results    | utf8                       |
    | character_set_server     | utf8                       |
    | character_set_system     | utf8                       |
    | character_sets_dir       | /usr/share/mysql/charsets/ |
    +--------------------------+----------------------------+
    8 rows in set (0.00 sec)
    
    +----------------------+-----------------+
    | Variable_name        | Value           |
    +----------------------+-----------------+
    | collation_connection | utf8_general_ci |
    | collation_database   | utf8_unicode_ci |
    | collation_server     | utf8_unicode_ci |
    +----------------------+-----------------+
    3 rows in set (0.00 sec)


How to create a mysql procedure


DROP PROCEDURE IF EXISTS mydatabase.datespopulate;

DELIMITER |
CREATE PROCEDURE mydatabase.datespopulate(dateStart DATE, dateEnd DATE)
BEGIN
  WHILE dateStart <= dateEnd DO
     INSERT INTO mydatabase.datetable (d) VALUES (dateStart);
    SET dateStart = date_add(dateStart, INTERVAL 1 DAY);
  END WHILE;
END;

DELIMITER ;
CALL mydatabase.datespopulate('2013-02-01','2015-06-30');

delete from mydatabase.datetable;

Default Maven plugins (Core Plugins)


A Plugin for executing external programs
mvn exec:exec

A plugin for compile and execute selected program with argumants
compile exec:java -Dexec.mainClass=camelinaction.FilePrinter -Dexec.args="100"


Delete the target folder and compile java classes
mvn clean compile


Deploys an arbitrary artifact to the JBoss application server
mvn jboss-as:deploy


First run the clean, build the project and install the artifact to the local repository
mvn clean install 


Executes the supplied java class in the current VM with the enclosing project's dependencies as classpath
mvn exec:java
   
    org.codehaus.mojo
    exec-maven-plugin
    1.1
    
     MyClass


Displays the dependency tree for the current project
mvn dependency:tree


Monday, March 4, 2013

Jboss AS 7 & Maven 3


  1. How to deploy the .war , .ear or .jar to the jboss AS7 while you package your project in eclipse 

  • In the eclipse Juno add the following parameter in the configuration option. Parameter Name  jboss-as.home and Value [Your jboss AS7 home path]
  • Add the following plug-in to the .pom file
  • Option 1
     
      
        org.jboss.as.plugins
        jboss-as-maven-plugin
        7.3.Final
        
         
          package
          
           deploy


  • Option 2
       
        org.jboss.as.plugins
        jboss-as-maven-plugin
        7.3.Final
       
      
In the clipse goals add the following 
jboss-as:deploy


Wednesday, February 27, 2013

Install JDK7 on Ubuntu 12.10

Note : This is applicable for Any Java Version and Any Ubuntu Version
  • Download the JDK disiered version and extract the .bin file
  • Move the extracted folder to the default JVM folder
  • Install new java source in system:
sudo update-alternatives --install /usr/bin/javac javac /usr/lib/jvm/jdk1.7.0_15/bin/javac 1
sudo update-alternatives --install /usr/bin/java java /usr/lib/jvm/jdk1.7.0_15/bin/java 1
sudo update-alternatives --install /usr/bin/javaws javaws /usr/lib/jvm/jdk1.7.0_15/bin/javaws 1

  • Select default java:
sudo update-alternatives --config javac

sudo update-alternatives --config java

sudo update-alternatives --config javaws


  • Test the updated java version:
java -version

  • Verify the all point to the new java location:

ls -la /etc/alternatives/java* 

 
There is a GUI tool in Ubuntu called "Alternative Configurator" which you can manually 
update above.